
Why 3D Print Electronics Enclosures?
3D printing has revolutionized the way makers, engineers, and hobbyists approach electronics projects. Gone are the days of repurposing old project boxes or trying to modify generic enclosures. With 3D printing, you can create custom electronics enclosures that perfectly fit your components and meet your project’s unique requirements. Whether you’re prototyping a Raspberry Pi project, building a custom sensor device, or just want a slick case for your Arduino, 3D printing offers flexibility, speed, and cost savings.
What Makes a Good 3D Printed Electronics Enclosure?
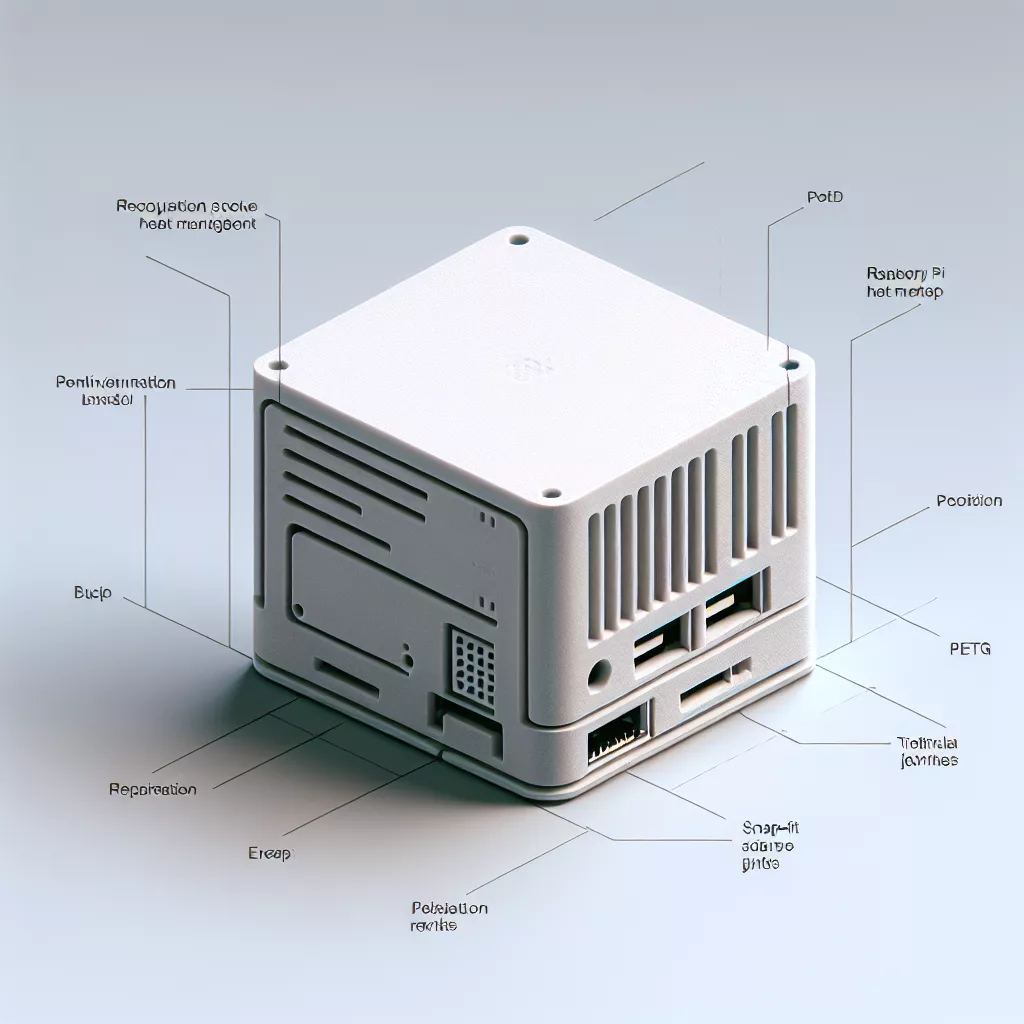
A good electronics enclosure needs to do more than just look good—it should protect sensitive components, allow for adequate ventilation, and provide secure mounting for circuit boards, displays, connectors, and buttons. When designing or choosing a printable enclosure, consider the following:
- Material Strength: Will it protect against drops and impacts?
- Thermal Management: Is there enough airflow for heat-generating components?
- Access: Are ports, switches, and displays accessible?
- Assembly: Will it snap together, use screws, or require glue?
- EMI Shielding: Do you need protection from electromagnetic interference?
Best Materials for 3D Printed Electronics Enclosures
Choosing the right filament is crucial. Here are the most popular options:
- PLA: Easy to print, but not recommended for high-heat environments as it can deform around hot components.
- PETG: Tough and slightly flexible, PETG is more heat-resistant than PLA and a great all-around choice for enclosures.
- ABS: Strong and heat-resistant, ABS is often used in commercial electronics, but it requires a heated bed and good ventilation due to fumes.
- ASA: Similar to ABS, but with better UV resistance, ideal for enclosures exposed to sunlight.
- Specialty Materials: For specific needs, consider flexible filaments (like TPU) or carbon fiber blends for extra strength.
Designing Your Enclosure: Tips from Experience
Custom design is where 3D printing shines. Here are some practical recommendations:
- Tolerances: Leave enough clearance for components – usually 0.2–0.5mm larger than your measured parts.
- Standoffs: Integrate mounting posts for PCBs. Standard M3 or M2.5 holes work well for most boards.
- Ventilation: Add slots or grids near heat sources (like voltage regulators or microcontrollers).
- Snap-Fit or Screws: Test snap-fit designs for tool-free assembly, or add brass inserts for durable threaded holes.
- Labels: Emboss or engrave symbols for ports and buttons directly into your design.
- EMI Shielding: For sensitive projects, consider lining the inside with copper tape or conductive paint after printing.
Printing Your Enclosure
Once your design is ready, it’s time to print. Here are some practical steps:
- Use Appropriate Layer Heights: For visible surfaces, 0.1–0.2mm layers look cleaner. For hidden/internal parts, 0.2–0.3mm is fine and prints faster.
- Infill: 20-40% infill is sufficient for strength; use more if you need a particularly rugged case.
- Supports: Use them sparingly. Design your box in two halves to avoid complex overhangs.
- Cooling: Fans help with PLA, but for ABS and PETG, minimize airflow to prevent warping.
Post-Processing and Assembly
After printing, you might need to do a bit of cleanup:
- Remove Supports: Carefully trim any supports using flush cutters or a craft knife.
- Drill Holes: Fine-tune openings for switches or connectors with a drill or file.
- Threaded Inserts: For repeated assembly, use a soldering iron to install brass heat-set inserts.
- Painting: For a professional look, sand and paint your enclosure. Use primer and acrylic paint for best results.
Common Applications
3D printed enclosures are used across countless projects, including:
- Raspberry Pi and Arduino cases
- IoT sensor housings
- Custom remote controls
- Wearable electronics
- Robotics projects
- Prototyping for product development
Conclusion: Limitless Possibilities
With the right material, thoughtful design, and attention to detail, you absolutely can 3D print electronics enclosures that rival (and often surpass) off-the-shelf alternatives. Whether you’re a hobbyist bringing ideas to life or a professional iterating on prototypes, 3D printing puts the power of custom enclosure fabrication in your hands like never before. Start designing, and see just how far your creativity can go!
Leave a Reply