
Why Add Metal Finishes to 3D Prints?
Giving your 3D prints a metallic finish can significantly elevate their appearance, making simple plastic creations look like solid metal parts. Whether you’re making cosplay props, jewelry, decorative items, or prototypes, a metal finish adds professional appeal and durability. While 3D printers commonly use plastics like PLA, ABS, or PETG, you can achieve convincing metal looks through several post-processing techniques.
Choosing the Right Filament for Metal Finishing
Before exploring finishing methods, consider starting with the right base material. While standard PLA or ABS works well, there are specialty filaments infused with fine metal powders (such as bronze, copper, or stainless steel). These filaments can provide a more authentic metallic weight and feel, and they react differently to finishing techniques.
Essential Tools and Materials
For most metal finishing methods, you’ll need the following:
- Sandpaper (grits 120 to 2000)
- Primer (recommended: filler primer for smoother surfaces)
- Spray paints (metallic shades like silver, gold, bronze, or chrome)
- Polishing compound and cloths
- Protective gloves and mask
- Optional: Rub ‘n Buff, metal leaf, or patina solutions for special effects
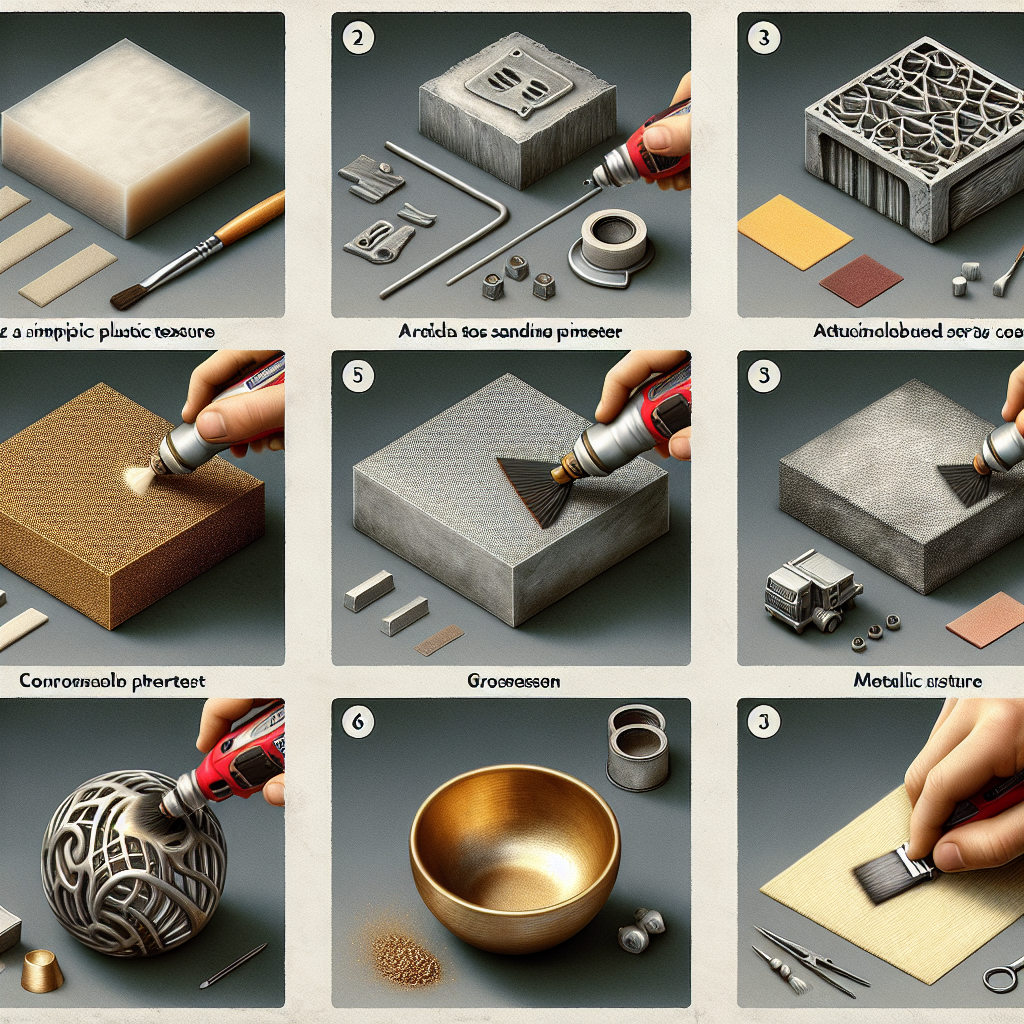
Step-by-Step: Achieving a Metallic Finish
1. Surface Preparation
The foundation of a great metal finish is a smooth print surface. Start by removing any supports and sanding your print. Begin with a coarse grit to eliminate layer lines, then move progressively to finer grits until the surface is smooth. For particularly visible print lines or rough surfaces, apply a filler primer and sand again. A glass-smooth base will better reflect metallic paint, enhancing realism.
2. Application of Primer
A primer ensures proper paint adhesion and further smooths minor imperfections. Apply the primer in thin, even coats, allowing it to dry between applications. Sand lightly with fine-grit paper after the primer dries for a flawless base.
3. Metallic Painting
Once primed, you can paint the print using high-quality metallic spray paint. Hold the can 20-30 cm away and spray light, even coats to avoid drips or pooling. Let each coat dry before applying the next. For an authentic look, try layering different metallic tones or using specialized chrome, aluminum, or gold finish sprays.
4. Detailing and Patina
For added realism, consider weathering effects. Use a dry brush technique with darker or contrasting metallic shades to highlight details and simulate wear. Alternatively, products like Rub ‘n Buff or metal leaf can be applied to raised surfaces for extra luster. You can also carefully apply a patina solution for an antiqued appearance.
5. Polishing and Sealing
Once satisfied with the finish, gently polish the surface with a soft cloth and polishing compound. This step brings out the metallic shine and smooths any minor imperfections in the paint. To protect your work, apply a clear acrylic sealer or lacquer. Choose a matte, satin, or glossy finish to match your desired metal look.
Specialty Methods: Metal Plating and Metal-Filled Filaments
For the most authentic results, consider more advanced techniques:
- Electroplating: This process involves coating your print with a conductive layer (such as graphite paint), then electrodepositing real metal onto its surface. It’s more complex but results in a true metal shell.
- Metal-Filled Filaments: As mentioned earlier, prints made from filaments with metal powders can be sanded and polished to achieve a subtle metallic sheen. Some users even apply a light acid or patina to create unique finishes.
Tips for Realistic Results
- Take your time with surface prep—imperfections are magnified by metallic finishes.
- Experiment with different paints and finishes to achieve your desired effect.
- For props or display items, layering different metallic tones creates depth and realism.
- If replicating a specific metal (like aged bronze or brushed steel), study real-world references for color and wear patterns.
Conclusion
Adding metal finishes to 3D prints is one of the most rewarding ways to transform digital designs into eye-catching, professional-quality objects. With careful preparation and the right materials, even basic FDM prints can become striking metallic masterpieces. Don’t be afraid to experiment and discover your favorite techniques—metal finishing is as much an art as it is a science.
Leave a Reply